Tilesets & Datasets: Managing Data in Mapbox Studio
Published on Feb 15, 2021 by Ben Tyler
This post is part of a series of guides and tutorials on Mapbox. The majority of the posts will focus on how you can use Mapbox with React, but will also additionally focus on other parts of the Mapbox suite such as Mapbox Studio and various Mapbox APIs. The series will start with relatively simple use cases and build into more complex examples.
Thus far we have
- covered how to create a basic map using Mapbox and React (read post),
- developed a cheatsheet for the predefined Mapbox Styles (read post)
- covered how to create a custom style in Mapbox Studio and add it to a React app (read post)
These guides are helpful for establishing some basic familiarity with Mapbox, but only get you so far when the rubber hits the road. If you are building an interactive map, chances are you trying to portray some real data and not just some hello world nonsense.
The aim of this post is to provide an overview of two key features of Mapbox Studio, Tilesets and Datasets and how they can be used to manage and integrate real data into a Mapbox style and application. This guide will not provide the ins and outs how to use tilesets and datasets, but instead will focus on providing the context of how they fit into the larger Mapbox ecosystem.
Datasets Overview

Dataset can a loaded term that means a whole of different things in different contexts. In the context of Mapbox Studio, a dataset refers to an editable collection of GeoJSON features. Simplified even further, it is essentially data stored in a JSON that is formatted in a very specific way that also has an added field to capture spatial data (“geometry”). It is the rawest form of data in Mapbox Studio.
A very key point is that Datasets cannot be directly added to a Mapbox Style. They first need to be exported as a Tileset. The exported Tileset can then be added easily to a map style. I like to think of datasets as my foundation. I cannot do much with a dataset directly, but I can build a lot of things on top of it.
Common Use Cases
- lightweight spatial data editing/creation
- managing data that has the potential to update regularly
- easy to transform spatial-like data into a true spatial format
- i.e. converting a CSV with latitude and longitude columns into a tileset
Drawbacks
- no bulk editing
- for more complex use cases, you need to learn how to leverage the Datasets and Uploads APIs
To learn the ins and outs of working with datasets, check out the Mapbox documentation.
Tilesets Overview
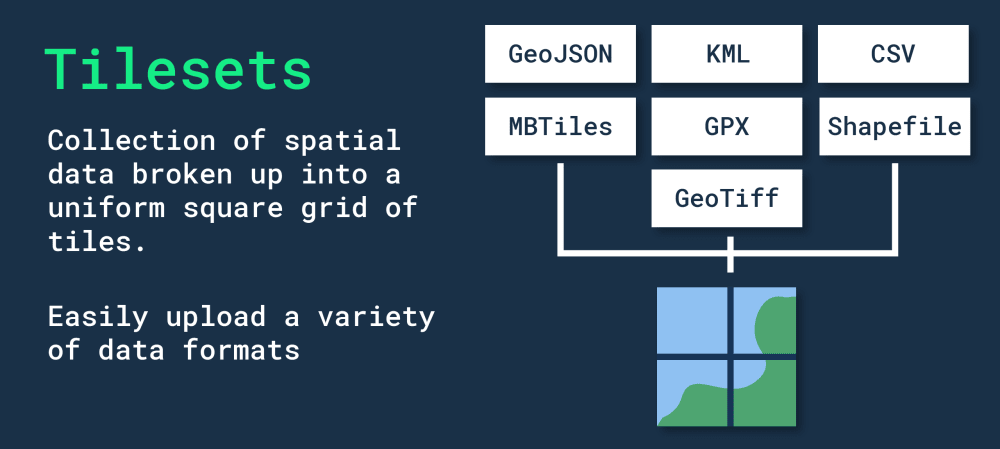
Tilesets are the meat and potatoes of Mapbox Studio. They represent a collection of vector or raster data broken up into a nice uniform square grid of tiles. If you want to add something to a style via Mapbox Studio, you will need to create a tileset for it. Luckily, this is as uploading a shapefile or as easy as exporting a dataset to a tileset most of the time.
Maybe not 100% accurate, but my model for the differences between Datasets and Tilesets is viewing Datasets like a CSV and Tilesets like a Shapefile. You can view and edit data in a CSV but you cannot do much more than that whereas you view, edit, map, and analyze data in a shapefile.
To learn the ins and outs of working with Tilesets, check out the Mapbox documentation.
Common Use Cases
- displaying any sort of non-Mapbox spatial data
- exporting a Dataset for use in a custom Mapbox style
Drawbacks
- cannot edit a Tileset
- updating a Tileset usually requires that you re-upload and replace the existing Tileset
Thinking in Datasets and Tilesets

When I first started using Mapbox Studio, one of the hardest things to get my head around was the difference between datasets and tilesets and how they fit into the styles editor and Mapbox GL JS. It can be easy to view these three feature sets in isolation, but viewing them as connected steps in a process helped me.
Here is a common data flow for working with Mapbox Studio.
- Find spatial data you want to view and analyze
- Upload spatial data to Mapbox Studio (choose one of the following)
- Upload data as dataset and then export to a tileset
- Upload data as a tileset
- Edit and manage spatial data in Mapbox Studio
- Add spatial data to a Mapbox Style
One of the things that initially tripped me up was deciding when to use Datasets and when to use a Tileset as both are valid entry points into the data workflow. My general rule of thumb is that if I want a nice UI to make simple edits to my spatial data, I will reach for Datasets, otherwise I reach for Tilesets.
A Real World Example
Now that I have provided an overview of Datasets, Tilesets, and how they fit together in theory, I will provide an actual use case from a data-driven mapping application I have built.
I recently built an application that allows users to see places where they can trail run, fish, and grab a beer afterwards. There are a couple of key spatial datasets that this application relies on:
- the course data (line strings representing the trail/path the user can run along)
- watershed boundaries (polygons representing the fisheries)
Deciding What to Use
One of the other rules of thumbs I use when determining if I should use a Dataset or a Tileset is the frequency that the data will need to be updated. If it is on the more frequent side of things, I will opt to use a Dataset.
For this example, I knew the course data would change over time as more places to run and fish got added to the application so I opted to manage this data as a Dataset. The watershed boundaries are not likely to change (barring some massive earthquake or geologic event) and represent a perfect use case for a Tileset.
Getting the Data into Studio
When I started building the application, I already had a lot of the course data available as GPX files from Strava. You unfortunately cannot upload GPXs as a tileset so I had to convert these to GeoJSON first. After doing so, I uploaded the course data as a Dataset using Mapbox studio. Once I had all my courses added, I exported them to a Tileset. When I needed to add new courses, I opened up my existing Dataset and used the import feature to bring in the additional courses.
Adding in the watershed boundaries was even easier. I just navigated to the Tilesets page in Mapbox Studio and uploaded a shapefile I had that contained the watershed boundaries.
Adding the Data to a Mapbox Style
With both of key spatial components now available as Tilesets, all that was left to do was to create a custom Mapbox style and add my two Tilesets. If you want to learn how to add a Tileset to a Mapbox Style, make sure to check out this guide.
Adding the Style to a React App
Once the Tilesets were added to my custom Mapbox Style, the only remaining task was integrating the Style into my React frontend. For a guide on how to do this, please refer to my earlier post, Introduction to Mapbox and React.
Next Steps
The above workflow is a simplified version of what I implemented. On the final versions of the app, I got the chance to leverage some really cool Mapbox products like the Uploads and Datasets API. I will most likely cover this in a future post though so stay tuned!
If you found thus post useful, give me a follow on Twitter or consider picking up a copy of the Building Interactive Maps with React course.
Useful Links and Resources
- Datasets Docs (https://docs.mapbox.com/studio-manual/reference/datasets/)
- Tilesets Docs (https://docs.mapbox.com/studio-manual/reference/tilesets/)
About Me
Howdy, I am Ben Tyler. I am a product-focused engineer who cares deeply about finding the simplest solution to a user's problem.
I love collaborating on projects, so if you need a hand, please schedule a call or get in touch at hello@lostcreekdesigns.co!
Schedule a Call!