How to Create a Map Popup Component Using Mapbox and React
Published on Apr 25, 2021 by Ben Tyler
This post is part of my free Building Interactive Maps with React course - a course for anyone wanting to learn how to build interactive maps and integrate them into their React applications. If you enjoy this guide, then chances are you will enjoy the course too!
What You Will Learn
Interactivity is part of what makes web maps so compelling. A relatively easy way to add interactivity to a web map is by adding popups to display information about your map layers. This guide will teach you how to add popups to a web map using React and Mapbox GL JS.
Introduction
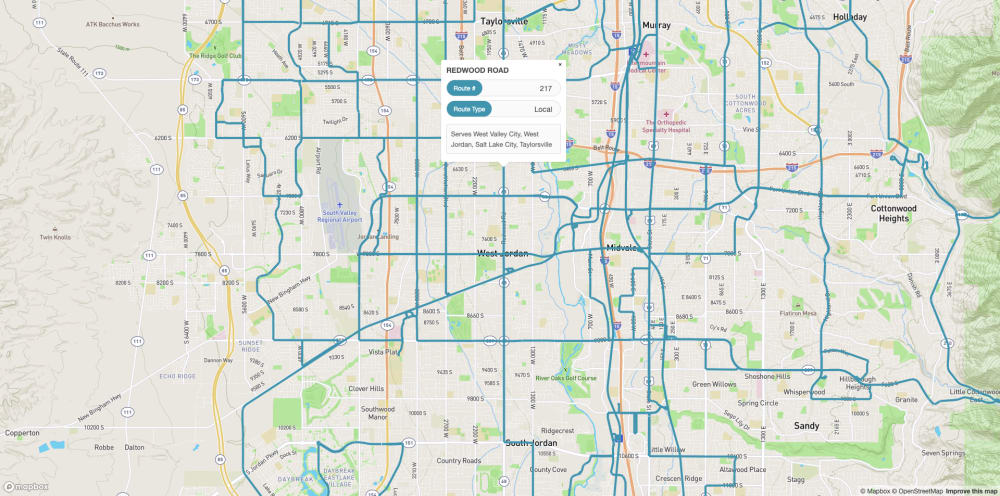
If I am building a map for a client, one of the first things they typically ask is “Can it have popups?” As such, understanding how to quickly build and style map popups has become an essential part of my development workflow. Luckily the process is relatively straight forward and React and Mapbox GL JS play very nicely together. For this guide, we will be building a simple map showcasing bus routes for Salt Lake City, Utah and creating a simple map popup that shows some info about a route when a user clicks on it.
Getting Started
This guide assumes you have moved through the other guides that are part of this course and are now comfortable creating an interactive map using Mapbox GL JS and React.
For ease of use, we are going to use Create React App to get our application up and running. If you would like to follow along, I have put together both a Code Sandbox and an example repository which you can find here.
To begin, create a new application using Create React App and navigate into the project.
npx create-react-app mapbox-and-popupscd mapbox-and-popupsIn the root of the project, create a new .env file and copy your Mapbox access token from your account page. If you need a refresher on how to get your access token, check out the Introduction to Mapbox and React guide. Then create a new entry in the .env file titled REACT_APP_MAPBOX_TOKEN and set its value equal to the access token you copied to your clipboard. It is generally best practice to store sensitive information like access tokens in a .env file and keep them out of version control.
REACT_APP_MAPBOX_TOKEN=<YOUR_TOKEN_HERE>Next, we need to add the Mapbox GL JS library to our project as a dependency.
# yarnyarn add mapbox-gl# npmnpm install mapbox-glSetting Up the Map
As mentioned earlier, we will be creating an interactive map that shows bus routes in Salt Lake City and displays a popup with some some information on the bus route when the user clicks on a route. This tutorial assumes you already know how to setup a basic map and add a source and layers to it. If you are not familiar with this workflow, please review the Introduction to Mapbox and React guide and the A Complete Guide to Sources and Layers in React and Mapbox GL JS guide before continuing.
For the sake of simplicity, I will be setting up the map in the root of the src directory in the App.js file. The following snippet does the following:
- creates a basic interactive map
- adds a spatial data source for the bus routes using an ESRI API
- adds a line layer to the map for visualizing the bus routes
import React, { useRef, useEffect } from "react"import ReactDOM from "react-dom"import mapboxgl from "mapbox-gl"// import the mapbox styles// alternatively can use a link tag in the head of public/index.html// see https://docs.mapbox.com/mapbox-gl-js/api/import "mapbox-gl/dist/mapbox-gl.css"import "./App.css"// Grab the access token from your Mapbox account// I typically like to store sensitive things like this// in a .env filemapboxgl.accessToken = process.env.REACT_APP_MAPBOX_TOKENconst App = () => { const mapContainer = useRef() // this is where all of our map logic is going to live // adding the empty dependency array ensures that the map // is only rendered once useEffect(() => { // create the map and configure it // check out the API reference for more options // https://docs.mapbox.com/mapbox-gl-js/api/map/ const map = new mapboxgl.Map({ container: mapContainer.current, style: "mapbox://styles/mapbox/outdoors-v11", center: [-111.94, 40.611], zoom: 12, }) // only want to work with the map after it has fully loaded // if you try to add sources and layers before the map has loaded // things will not work properly map.on("load", () => { // bus routes source // another example of using a geojson source // this time we are hitting an ESRI API that returns // data in the geojson format // see https://docs.mapbox.com/mapbox-gl-js/style-spec/sources/#geojson map.addSource("bus-routes", { type: "geojson", data: "https://opendata.arcgis.com/datasets/4347f3565fbe4d5dbb97b016768b8907_0.geojson", }) // bus routes - line layer // see https://docs.mapbox.com/mapbox-gl-js/style-spec/layers/#line map.addLayer({ id: "bus-routes-line", type: "line", source: "bus-routes", paint: { "line-color": "#4094ae", "line-width": 4, }, }) }) // cleanup function to remove map on unmount return () => map.remove() }, []) return <div ref={mapContainer} style={{ width: "100%", height: "100vh" }} />}export default AppDeciding What to Show in the Popup
Now that we have the bus routes displaying on our map, it is time to add some interactivity. The goal is to display some information about a bus route when a user clicks on the route on the map. To accomplish this we will be creating a Popup component and then adding some logic to render the Popup component with information about the route the user clicked on.
Each bus route has some basic metadata. The snippet below highlights the type of data that is available for each route.
{ "FID": 96, "LineAbbr": "F578", "LineName": "7800 S FLEX", "Frequency": "30", "RouteType": "Flex", "City": "Midvale, West Jordan", "County": "Salt Lake", "AvgBrd": 101, "SHAPE_Length": 0.14346444450222645}The info that is likely most relevant for the user are the LineAbbr, LineName, RouteType, and City properties. Accordingly, we will setup the map popup to display the data for these fields.
Creating the Popup
Now that we have decided what information we would like to highlight, we can go about creating our Popup component. For ease of demonstration, I am going to create the Popup component in our existing App.js file versus breaking the component out into its own file.
Here is the full snippet for creating the Popup component and getting it wired up to the map. If you are just looking for a snippet, feel free to copy and paste and go on your way. Otherwise, I will continue with a detailed explanation below.
import React, { useRef, useEffect } from "react"import ReactDOM from "react-dom"import mapboxgl from "mapbox-gl"// import the mapbox styles// alternatively can use a link tag in the head of public/index.html// see https://docs.mapbox.com/mapbox-gl-js/api/import "mapbox-gl/dist/mapbox-gl.css"import "./App.css"// Grab the access token from your Mapbox account// I typically like to store sensitive things like this// in a .env filemapboxgl.accessToken = process.env.REACT_APP_MAPBOX_TOKEN/** * Our custom Popup component used to render a nicely styled * map popup with additional information about the * user's selected bus route */const Popup = ({ routeName, routeNumber, city, type }) => ( <div className="popup"> <h3 className="route-name">{routeName}</h3> <div className="route-metric-row"> <h4 className="row-title">Route #</h4> <div className="row-value">{routeNumber}</div> </div> <div className="route-metric-row"> <h4 className="row-title">Route Type</h4> <div className="row-value">{type}</div> </div> <p className="route-city">Serves {city}</p> </div>)const App = () => { const mapContainer = useRef() const popUpRef = useRef(new mapboxgl.Popup({ offset: 15 })) // this is where all of our map logic is going to live // adding the empty dependency array ensures that the map // is only rendered once useEffect(() => { // create the map and configure it // check out the API reference for more options // https://docs.mapbox.com/mapbox-gl-js/api/map/ const map = new mapboxgl.Map({ container: mapContainer.current, style: "mapbox://styles/mapbox/outdoors-v11", center: [-111.94, 40.611], zoom: 12, }) // only want to work with the map after it has fully loaded // if you try to add sources and layers before the map has loaded // things will not work properly map.on("load", () => { // bus routes source // another example of using a geojson source // this time we are hitting an ESRI API that returns // data in the geojson format // see https://docs.mapbox.com/mapbox-gl-js/style-spec/sources/#geojson map.addSource("bus-routes", { type: "geojson", data: "https://opendata.arcgis.com/datasets/4347f3565fbe4d5dbb97b016768b8907_0.geojson", }) // bus routes - line layer // see https://docs.mapbox.com/mapbox-gl-js/style-spec/layers/#line map.addLayer({ id: "bus-routes-line", type: "line", source: "bus-routes", paint: { "line-color": "#4094ae", "line-width": 4, }, }) }) /** * Event handler for defining what happens when a user clicks on the map * In this example, we are checking if the user has clicked on a bus route * If they have, we want to render a popup with the data for the selected * bus route * Else, do nothing */ map.on("click", e => { const features = map.queryRenderedFeatures(e.point, { layers: ["bus-routes-line"], }) if (features.length > 0) { const feature = features[0] // create popup node const popupNode = document.createElement("div") ReactDOM.render( <Popup routeName={feature?.properties?.LineName} routeNumber={feature?.properties?.LineAbbr} city={feature?.properties?.City} type={feature?.properties?.RouteType} />, popupNode ) popUpRef.current .setLngLat(e.lngLat) .setDOMContent(popupNode) .addTo(map) } }) // cleanup function to remove map on unmount return () => map.remove() }, []) return <div ref={mapContainer} style={{ width: "100%", height: "100vh" }} />}export default AppThe Popup Component
Let’s start with the Popup component.
/** * Our custom Popup component used to render a nicely styled * map popup with additional information about the * user's selected bus route */const Popup = ({ routeName, routeNumber, city, type }) => ( <div className="popup"> <h3 className="route-name">{routeName}</h3> <div className="route-metric-row"> <h4 className="row-title">Route #</h4> <div className="row-value">{routeNumber}</div> </div> <div className="route-metric-row"> <h4 className="row-title">Route Type</h4> <div className="row-value">{type}</div> </div> <p className="route-city">Serves {city}</p> </div>)The component is super simple and only expects to be passed props for the routeName, routeNumber, city, and type. We then write some basic JSX to control how the provided information is structured and then add class names to control the information is styled. Because we are leveraging the Mapbox GL JS Popup class, we really do not have do much in terms of styling and functionality to get the popup displaying as desired. Mapbox handles all of the hard stuff like the popup positioning and base styles for us.
The base popup styles are pretty boring though so I decided to spruce them up a bit for this guide. Here are the css rules that are being loaded in from an App.css file in my application.
.mapboxgl-popup-content { min-width: 200px;}.route-metric-row { align-items: center; background-color: #fafafa; border: 1px solid #ddd; border-radius: 16px; display: flex; justify-content: space-between; margin: 8px 0; padding-right: 4px 12px;}.row-title { align-items: center; background-color: #4094ae; border: 1px solid #4094ae; border-radius: 16px; color: #ffffff; font-weight: normal; justify-content: center; margin: 0; padding: 4px 12px; text-align: center;}.row-value { color: rgba(0, 0, 0, 0.7); font-size: 0.875rem; padding-right: 16px; text-align: right;}.route-name { color: rgba(0, 0, 0, 0.7); font-size: 0.875rem; margin: 0;}.route-city { background-color: #fafafa; border: 1px solid #ddd; border-radius: 4px; color: rgba(0, 0, 0, 0.65); font-size: 0.8rem; margin-bottom: 0; padding: 8px;}Creating a Popup Instance
The next step in this process is initializing a new Mapbox GL JS popup instance and storing it in a ref. The Popup constructor can take a variety of configuration options. For our purposes, we are leveraging the offset option to ensure that the popup renders 15px away from the feature the user has clicked on. For a complete list of the available configuration options please check out the Mapbox Popup docs.
const popUpRef = useRef(new mapboxgl.Popup({ offset: 15 }))Rendering the Popup When the User Clicks on a Route
After creating our Popup component and a new instance of the Mapbox Popup class, we need to add logic to our map that tells Mapbox to display the Popup component when a user clicks on a bus route.
We begin by adding an event handler for when the user clicks on the map. You can imagine the laundry list of things you could do when a user clicks on the map, but for our purposes we want to focus our attention on detecting if the user has clicked on the bus routes layer.
Mapbox provides a handy method on the Map class called queryRenderedFeatures that allows you to query the map for any map features that exist at a provided latitude and longitude. When a user clicks on the map, we get a special Mapbox event object that contains a latitude and longitude among other things that, we can easily pass to the queryRenderedFeatures method to determine if the user has clicked on the bus routes layers. The queryRenderedFeatures method also takes an optional options object that we will leverage to only query the map for features in the bus-routes-line layer. You can check out the Mapbox docs for more information on the method.
If the user has clicked on a bus route, the queryRenderedFeatures method will return an array of features, otherwise it will return an empty array. If the user did indeed click on a feature, we then want to execute a block of logic to create a new div, render the Popup component to it, and add it to the map at the latitude and longitude where the user clicked the map.
/** * Event handler for defining what happens when a user clicks on the map * In this example, we are checking if the user has clicked on a bus route * If they have, we want to render a popup with the data for the selected * bus route * Else, do nothing */map.on("click", e => { const features = map.queryRenderedFeatures(e.point, { layers: ["bus-routes-line"], }) if (features.length > 0) { const feature = features[0] // create popup node const popupNode = document.createElement("div") ReactDOM.render( <Popup routeName={feature?.properties?.LineName} routeNumber={feature?.properties?.LineAbbr} city={feature?.properties?.City} type={feature?.properties?.RouteType} />, popupNode ) popUpRef.current .setLngLat(e.lngLat) .setDOMContent(popupNode) .addTo(map) }})Next Steps
This all may seem like a lot initially (at least it was for me), but it becomes an easier design pattern that you will get used to like. The Popup component we built in this guide is relatively simple but React makes it possible to build some very complex and powerful popups will a relatively low amount of effort. For instance, I have had to add images, links, and event charts to popups and each of these use cases was a relatively minor lift. If you are hungering for more after this guide, I recommend trying one of these use cases next!
If you found thus post useful, give me a follow on Twitter or consider picking up a copy of the Building Interactive Maps with React course.
Useful Resources
About Me
Howdy, I am Ben Tyler. I am a product-focused engineer who cares deeply about finding the simplest solution to a user's problem.
I love collaborating on projects, so if you need a hand, please schedule a call or get in touch at hello@lostcreekdesigns.co!
Schedule a Call!